How to Improve Farsightedness Naturally
There are several versions of Farsightedness. We have the presbyopia and the hyperopia.
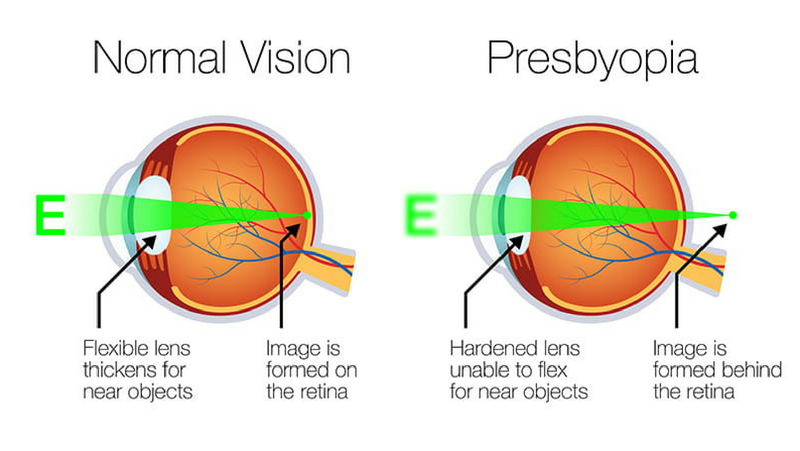
Presbyopia, also known as old age sight, happens when the lens becomes stiffer and loses its elasticity.
Hyperopia is when the distance between the cornea and the retina is too short (the eye is too short), so the parallel rays of the light land behind the retina instead of on it, which causes close objects to look blurry.
Whichever the version of your farsightedness it still remains a condition whereby you have a hard time focusing on things up close, and you lose the ability to adjust your eye muscles and lens to see clearly.

This post contains links to the products that I use myself or can recommend. If you buy products through these links, the price will be the same for you, and I will receive a small commission, which helps to support this blog. This is my affiliate policy.
Habits And Farsightedness
Farsightedness is often the result of poor eye care and bad habits.
The typical solution to the problem is that you start wearing magnifying glasses to see things up close, but this also disconnects you from your focusing muscles, and slowly you’ll need more and more magnification. Then eventually you start wearing a bifocal and then you need your farsighted glasses all the time.
The problem with far-sighted glasses is when you start wearing them, it eliminates the practice of being able to focus on detail while seeing the whole picture because the magnification glasses tend to distort the size of how you see things by making them much bigger than they are.
How To Improve Farsightedness Naturally
Ditch the bad habits and make some good ones.
The following exercises can both prevent and reduce your farsightedness because they increase eye flexibility, circulation and focusing skills.
Choose 2 to 3 exercises from the list and do them every day and mix them with a few relaxation exercises. Switch exercises once a week.
The principle is that you do a straining exercise and a relaxation exercise after one another. Always finish with a relaxation exercise.
If you feel that a particular exercise is not good for you or makes your eyes strain too much – you should try another one.
At the initial practice stage you should spend most of your time on the relaxation exercises, and try the more straining ones later.
In the beginning the exercises feel difficult, but it’s surprisingly how quickly the muscles become stronger and it becomes a lot easier after just a few days.
Always practice without your glasses, and in the case of larger defects, with the glasses smaller by 1 diopter.
Straining Exercises For Farsightedness
Stretching
Reading upside down
Reading of texts in various sizes
Thumb rotations
The Thumb Game
Exercise With Big and Small Letters
Eye dialog
Relaxation Exercises – Farsightedness
Long swings
MSM eye massage
Palming
N Breath and Palm Hum
Tongue Clock Palming
Sunning
Chinese Eye Acupressure
Figure 8 Eye Massage
Also eye pillows are amazing relaxation tools too.
The 7 Straining Exercise For Farsightedness
1. Stretching
An essential exercise to improve your eye muscles, because the elasticity of the eye muscles is vital for bending the natural lens for seeing close up objects. Start out gently with 2-3 repetitions of the moves in each direction, and as your eyes get more flexible, you can increase the number to 10 or what feels comfortable to you.
Start gently by doing 2-3 repetitions of the moves, and as your eyes become more flexible, you can increase to 10 repetitions or what feels comfortable to you.
This technique is principled by only, moving the eyes, not the head, as far as you feel possible to the corners.
Start with moving your eyes to the left and then to the right. Aim to see your ears.
Move your eyes diagonally. Try to see the corner of your eyebrow while looking up diagonally and your shoulder while looking down. Remember to keep your head facing straight at all times.
After this, move your eyes all the way up and downwards.
Repeat the entire procedure 3 times.
Then, finish up by rolling your eyes 360 degrees, to make sure you have remove additional tensions to the eyes.
2. Reading Upside Down
Reading an inverted text allows you to focus on what your eyes are seeing without the need to recognize the text.
This exercise will make you more aware of what your eyes see when reading and what we usually don’t focus on because we focus on the meaning of the text..

Turn any book a 180 degrees and set in such a distance that the text is slightly blurred.
Read each letter individually allowing the eye to move point by point while slowly and carefully following its shape. If it helps you, imagine you are moving a small black dot across the shape of each letter. Do not try to recognize the letters or words but only go through the letters with your eyes freely.
Close your eyes at the end of each line for a while and visualize the blackness of letters.
Now, watch the white stuff and space around words and letters. Go through these white places with your eyes and visualize that the background is white as the sunlight. From time to time, close your eyes and visualize that "the sheet is white and the letters are black".
Turn the book to normal position and check if you can see the text from nearer that before.
Note: Blink frequently and breathe freely all through this exercise.
3. Reading Of Texts In Various Sizes
If you have a far-sighted vision, the best solution to improve your sight is to read small print with your eyes relaxed.
Texts that have different print size will help your eyes to learn to focus on smaller and smaller letters while maintaining the dynamic relaxation of sight.
Set a text in a distance so that you can see the largest letters as slightly blurred, but recognized easily.
Start by looking at the large print, letter by letter. Let your eyes stroll around the letters and their shapes blackening the image you are watching.
Blink frequently and close your eyes once in a while, and visualize what you have just read.
Now, go to the smaller print and repeat step 2 & 3.
When you are not able to recognize the letters clearly anymore, start noticing what you have in your perception field - watch each strange and blurred object.
Do not strain the eyes, but look at the contours, edges, and space between the letters and words.
Blink so that your sight can stay relaxed.
Close your eyes once in a while and repeat this in your mind: "the sheet is white, and the letters are black."
If your sight is not too tired, repeat steps 4-8 for even smaller print.
Now, go back to the larger print. You will likely think of it as much clearer and bigger than at the beginning.
4. Thumb Rotations
We get so tunneled and narrow in our visual focusing today. This practice will help take our “the blinders” away.
Thumb rotations help develop the awareness of moving your eyes in a relaxed effortless manner and help improve ocular function.
It is also a great exercise for opening up the eye circulation, if you’ve been diagnosed with an eye disease, if your child has been diagnosed with ADHD and it’s great for athletes for performance.
Do this execise 2 minutes a day on both eyes.
Close your left eye and cover it with your left palm.
Extend your right arm out.
Make a fist with your right hand, but point your thumb up.
Fix your eyes on your thumb and start moving your arm round in circles as you follow it with your eyes.
Move the arm three times in each direction.
You can also gaze in that’s more straight ahead or more up, if you want. Or maybe more to your right side, or more to your left side. You can play with that, but you want to have a good field of view.
Move your whole body as you track your thumb.
Go nice and slowly.
Remember to feel your body as you do the rotations, so your eyeball doesn’t have to do all the visual processing.
Once you’ve finished you slowly take your left hand away and notice the difference.
5. The Thumb Game
The thumb game is a focusing practice. It will help your convergence ability, which is important for near focus and reading. This exercise is also a check to see if both eyes are working together.
Use both of your thumbs.
Point your thumbs upward.
Place your right thumb about 12 inches (30 cm) from your nose, right in your midline.
Place your left thumb behind your right thumb about 14 inches (35 cm) from your right thumb.
Focus on your right (front) thumb, so you now see two of your left thumb (back one).
Start moving your thumbs simultaneously in front of you. Keep the same distance between the hands. Move slightly up and down, back and forth, and to the sides. Do this for about 30 seconds.
Now shift your focus to the back thumb (you should see two near thumbs now) and repeat step 5.
Do step 5 & 6 two times.
Finish by doing a palming exercise for about 30 seconds.
Note: Blink frequently, breath freely and feel your body all through the exercise.
Tip 1: If you don’t see the “two thumbs” it means that you’re suppressing one of your eyes, so you can either blink or spread your thumbs a little more away from each other. Don’t’ worry after a few times you become very good.
Tip 2: You can substitute the back thump with other things. Just point one of your thumbs to something and do the same switches with your sight. Point at a door handle, a leave on a tree, a cup – whatever works for you as long as you manage to get the “double visions”.
6. Exercise With Big And Small Letters
This exercise practice the near and far vision, which improves eye accommodation and spatial perception.

The exercise requires letter charts that you can read from far and near. Download here.
Fix the bigger chart on the wall in a distance so that you can see it clearly.
Hold the smaller chart in your hand in a length where the text is visible, but slightly blurred.
Read the first three letters from the biggest chart.
Close your eyes for a second and recall the image of these three letters.
Then look at the smaller chart and read the same letters. Repeat the same with next three letters.
Now draw the smaller chart slightly nearer to yourself to see the letters blurrily and repeat step 3-5.
Notes:
Do no more than five repetitions of this exercise a time.
Should you feel any eye ache during the practice, stop and do some palming.
Blink and breathe to keep your sight relaxed at all times.
Tip:
During the exercise, you can read the letters in various ways. Read them by columns, rows or slantwise. You can also form more irregular shapes or just choose any lettering you like.
7. Eye Dialog
Purpose: The Eye dialogue exercise brings awareness of the filters you bring into your daily vision.
Equipment Needed: Clean hands and a journal to keep track of answers
How to perform:
Remove your glasses or contacts.
Cover one eye with your hand.
Start by covering your left eye and asking your right eye
“Right eye how old do you feel?”
“Right eye do you feel married to your left eye?”
“What is the marriage like between your right and left eye?”
“Right eye what do you need from the left eye?”
When you remove your hand take note of blur or clarity
Write your answers down then repeat by covering the right eye and talking to your left eye.
The 8 Relaxation Exercises
1. Long Swings
Purpose: Stimulate peripheral vision - opening up your vision, and it’s a great exercise to get limbered up in your eyes and body. Finish with doing a little palming – standing or sitting.
Note: These swings can be a little disorienting. If you start to feel dizzy, stop, sit down and do the palming exercise until you feel comfortable.
Stand in an open area with plenty of space.
Plant your feet hip width apart
Arms are dangling.
Swing the arms very slowly from side to side a few times.
Keep your hips, torso, shoulders, head and neck in line as you swing from side to side.
Keep your eyes open and focus on the horizon as the world passes by. Swing a couple of times to each side.
Then start looking over your upper right and left shoulders as you swing.
Then look to the middle a few times and then lower your gaze toward your hips a few times.
Variation:
Purpose: Activating the inner ear – the vestibular system. A great way to connect the inner ear system with the visual.
Have an anchor around your Hara area.
Widen your stance.
Perform the swings with your eyes closed.
In pace with your swings you can in your imagination look to your upper right and left. Middle and lower.
Other variation:
Change the speed of your swings.
2. MSM Eye Massage
My absolute favorite. I do it every day and several times a day, it's so refreshing.
MSM eye massage improves the lymph system and stimulation of tears. It moisturizes, detoxes and is excellent for inflammatory eye conditions, blepharitis and dry-eye.
Homemade MSM eye drops are 100 natural and free of harmful additives and pretty safe unless you’re allergic to salt or cruciferous veggies like broccoli, cauliflower, kale, etc. Test with a few drops on the skin of your arm first.
MSM is a powerful sulfur organic agent, which we also find in our body, and it helps reduce inflammation and is used to help reduce pain in the joints and improve skin, hair, and nail health, and it’s a great detoxifier.
When you instill MSM into your eyes, it moisturizes, reduces inflammation, and improves cellular permeability in the cornea – so it softens and makes the cornea more elastic. All the collagen in the eyes softens when you use MSM drops.
Instructions:
You can do it lying down in bed.
Wash your hands before you start.
Close your eyes.
Put one drop in the corner of each eye - or if you’re up for it, you can run the eyedrops back and forth along the eyelashes.
Spread the eye drops across the eyelashes with your fingers.
Then massage the upper and lower eyelids.
3. Palming
A very effective relaxation exercise for eyes and body. The aim is to see a black field, which will come with practice.
You can do this one either lying down or sitting.
Rub your hands vigorously together for about 10 sec.
Close your eyes and place your palms over your eyes.
Do some very slow breathing in and out through your nose (breathing through the nose relaxes the nervous system. Breathing through the mouth excites the nervous system).
Do 10 – 30 breaths like that.
Slowly take your hands away an notice that the world is a lot clearer, a lot brighter, and that you feel refreshed.
4. N-Breath And Palm Hum
This exercise is very calming and relaxing, and it’s effective at opening up the circulation in the eyes and releasing stress from eyes, brain, and body.
After the third breathing round, you’ll see things more clear and bright, and you’ll feel very relaxed.
When to do:
If you do it lying down, you can do it first thing in the morning or last thing before you go to bed.
Instructions:
You can do it lying down or sitting up.
Do 3 rounds of breathings - 18 breathings in total.
1 round is 6 breathings – 3 breathings without sound, and 3 with the hum sound.
One round goes like this:
Rub your palms together for about 10 sec.
Close your eyes
Place palms over your eyes
Place tongue on the roof of the mouth.
Close your mouth
Breath in through the nose
Visualize the letter N, as you
Exhale very slow and silent (mouth closed)
Feel the air tickling the back of your throat.
Do these 3 silent breathings 3 times
On the next 3 breathings, you add hum to the out breath
Change the angle of gravity. Gently start moving your body to the sides, back and forth, and / or in circles (optional).
After the 6th exhalation do some “open attention”. Relax and listen for a moment to how the stimuli have affected your body.
Repeat it all two more times.
Finish your practice by letting your hands down and notice how more clear and bright everything looks, and that you feel very relaxed.
Why we do what we do in this practice:
Changing the angle of gravity is important because it stimulates your vestibular system. That’s the inner ear mechanism that helps you with your body balance.
The tongue on the roof of the mouth. The tongue is the highest part of the spinal cord, by placing the tongue on the roof of the mouth you activate the spinal cord and spinal circulation. The tongue also has a connection to your digestive system, so that it will activate and improve your digestive health. It will open up the cervical spine – the big bone at the back of the neck have a powerful effect on your eye circulation and your eye tension.
The humming sound is a great way to release tension that we store in our eye and body tissue. It can help relax the jaw. Also, when you do the humming your breathing will get deeper and slower, so you’re oxidizing and hydrating yourself by making the sound. Keep the sound low and do it on the exhale.
5. Tongue Clock Palming
This exercise is excellent for opening up eye circulation, and for strengthening the peripheral vision. But most importantly it helps relax your eyes, jaw, face, and body, allowing them to better work together, and it will stimulate acupuncture points and the neuromuscular system.
The palming will direct the humming sound to the eye tissue, which will relax the eyes.
How to perform:
Rub your palms together for about 10 seconds.
Close your eyes and place your palms over your eyes.
Place your tongue at the 12 o’clock position, which is at the outside part of your upper front teeth and inside part of your upper lip.
Press the tongue against the inside of your lip as you breathe. Breathing goes like this:
Inhale - and make a humming sound when you exhale.
After you’ve done the 12 o’clock, you move to the 1 o’clock position. You place your tongue there and repeat the breathing in and out with humming on the out breath.
Repeat this around the clock from 12 - 11 o’clock.
Do the 12 o’clock one more time.
Finish the exercise going in to “open attention”:
Keep your palms over your eyes.
Take your head back a little bit.
Move very gently from side to side (micro movements).
Invite your eyes to float in the eye sockets. Randomly.
Couple your shoulders with your eyes (shoulder joint has the same muscle insertion as eye socket).
Invite your eyes to float in the watery eye sockets.
Continue for about a minute.
Slowly take your hands away.
Open your eyes.
Note that you see more clearly and that your peripheral vision is wider (panoramic vision).
The 12 o’clock position is an acupuncture point called The Governing Vessel. It runs up your head and down the spine all the way to the perineum - this is the Yang meridian in acupuncture. When you press that point, it opens up cervical spine c1 – c4. So you get the spread on a neuromuscular level, and you get the yang meridian stimulation.
The 6 o’clock position is an acupuncture point called The Conception Vessel. It runs down the front of the body. It’s the Yin meridian. This point will stimulate the thyroid, heart, respiratory and digestive system, but you’ll also spread cervical spine c1 – c4.
6. Sunning
Our eyes are light-sensing organs designed to receive light energy. Sunning helps our eyes stay healthy and vibrant.
As I mentioned, are a lot of eye problems are caused by eye tension and stress in the eye muscles, and sunning is a way to release harmful stress from the eyeball muscles, lower the sensitivity to bright light and minimize the need to wrinkling and blinking.
Sunning is a great way to relax your eyes - and an essential condition for the reeducation of sight.
Stand outside preferably around sunrise or sunset.
Close your eyes and face the sun.
Feel the warmth of the sun’s rays on your face and eyelids, while breathing deeply through your nose only.
Very slowly rock your head from side to side, or you can turn your head from shoulder to shoulder.
Be aware of your breathing as you feel the warmth of the sun and the energy of the sun on your eyes.
You’re in a receiving mode, so to speak. Receiving the rays of the sun.
You feel the sun touch you eyelids, and you invite your eyes to float very simple and randomly in the eye sockets.
Move your head about 30 times and come back to center.
Eyes still closed. Feel into your body. Notice the light and what you sense in your body and in your eyes. How is it affecting you etc?
Finish with palming for 8-10 breath.
Repeat everything two more times. Three times in total.
7. Chinese Eye Acupressure
This exercise can help improve the flow of energy in the eyeballs and head and is especially helpful when we begin to feel tired mentally.
If some of the pressure points are sensitive, it means that the energy flow is obstructed. The massaging movements allow the energy channels to open.

The exercise should be performed with thumb pads or index fingers depending on which are easier to press a given point with.
All the points are marked on the figure, and their precise location can be easily identified since when pressed, they will are a bit sore.
Gently massage and press each point to clear the flow of energy. The pressure should not cause acute pain, but be gradually increased as we are massaging a point.
3 green points on the upper eye pit bone. Massage with circular movements pressing gently.
3 blue points on the lower eye pit bone. You can also use several fingers here and massage the whole lower eye pit bone.
3 red points around the nose according to the figure. Massage gently on the nasal bone.
8. Figure 8 Eye Massage
This massage reduces stress and relaxes the eye muscles and opens up the circulation. It’s brilliant after extended contact lense or digital device use.
It spreads the tissue that gets clumped up around the eyes.
You can do this exercise either sitting or lying down.
Wash your hands.
Take two fingers on each hand (index and middle)
Point them together so the fingertips are touching.
Place the fingers on upper the inner side of the left eye brow – right over the nose.
Move all four fingers along the eyebrow out to the side, round and down. You follow the bone around the eyes. Then move the fingers over the nose and continue around the right eye. Drawing a figure 8.
Say the sound “E” while you move the fingers, this will help lateralize tissue.
Do 6-8 rounds.
Then massage your eyes:Place your index and middle fingers on your top eyelids and massage gently with a very light touch. Just make small circles with the fingers.
Massage the lower eyelids and the corners the same way – about 30 circles in each area.
Finish off by palming (see above).
Other Relaxation Exercises
Circular Movements With The Neck
Lower the chin as much as possible, move the head slowly from shoulder to shoulder and breathe freely.
Abdominal Breathing
Start this exercise by clearing your lungs. Breathe in with through your nose and exhale out through the pressed lips.
Now place your hands on your belly and let them move up and down as you breathe in and out, through your nose only.
Breathe in on a count to three, hold your breath for three, breathe out on count to three, then stop breathing for three counts again.
Do it 3-4 times (or more).
Bonus Tip:
Blink away. If you catch yourself squinting, because it help you see better, then stop and blink rapidly instead. That will help your muscles to relax and help you focus.